Implement GA4 Ecommerce Tracking on Magento 2 without Extension
GA4 is the new tracking tool introduced in 2020 which worked alongside the then primary Universal Analytics (UA). GA4 brought a new event-based tracking approach which is much simpler, streamlined and platform independent compared to UA. By late 2022 Google started pushing GA4 as default tracking method, and in July 2023, Google officially discontinued Universal Analytics.
Though event tracking in GA4 is backward compatible, meaning your existing UA events should work on GA4 as well, however it is always a good idea to update the data tracking as per the GA4 recommended guidelines.
Magento 2 is very slow in bringing GA4 support, it still does not have full official full support for GA4 tracking despite being the primary tracking method for most. Though they did add inbuilt GA4 tracking method from version 2.4.5, but you will still need to push the data to GA4 in order to track the e-commerce events, as it is not done automatically in Magento.
There are two ways of how you can implement ecommerce tracking in Magento 2, one using a 3rd party extension or via custom implementation. In this article we will explore the later option of how you can implement GA4 manually on Magento 2 without 3rd party extensions. If you even have the very basic knowledge of PHP, Magento and JSON you can follow this tutorial and implement tracking in no time.
Prerequisites
Before we dive into the setup, make sure you understand the basic requirements:
- A Google Tag Manager account and container.
- A Google Analytics 4 property.
- Access to your Magento 2 admin panel.
- Basic understanding of PHP, Magento 2 template and JavaScript.
If you are ready with the above items, let’s get started

Adding GTM Tracking Tag in Magento 2
Once you create an account and a container you will find a tracking tag from the container dashboard in google tag manager.
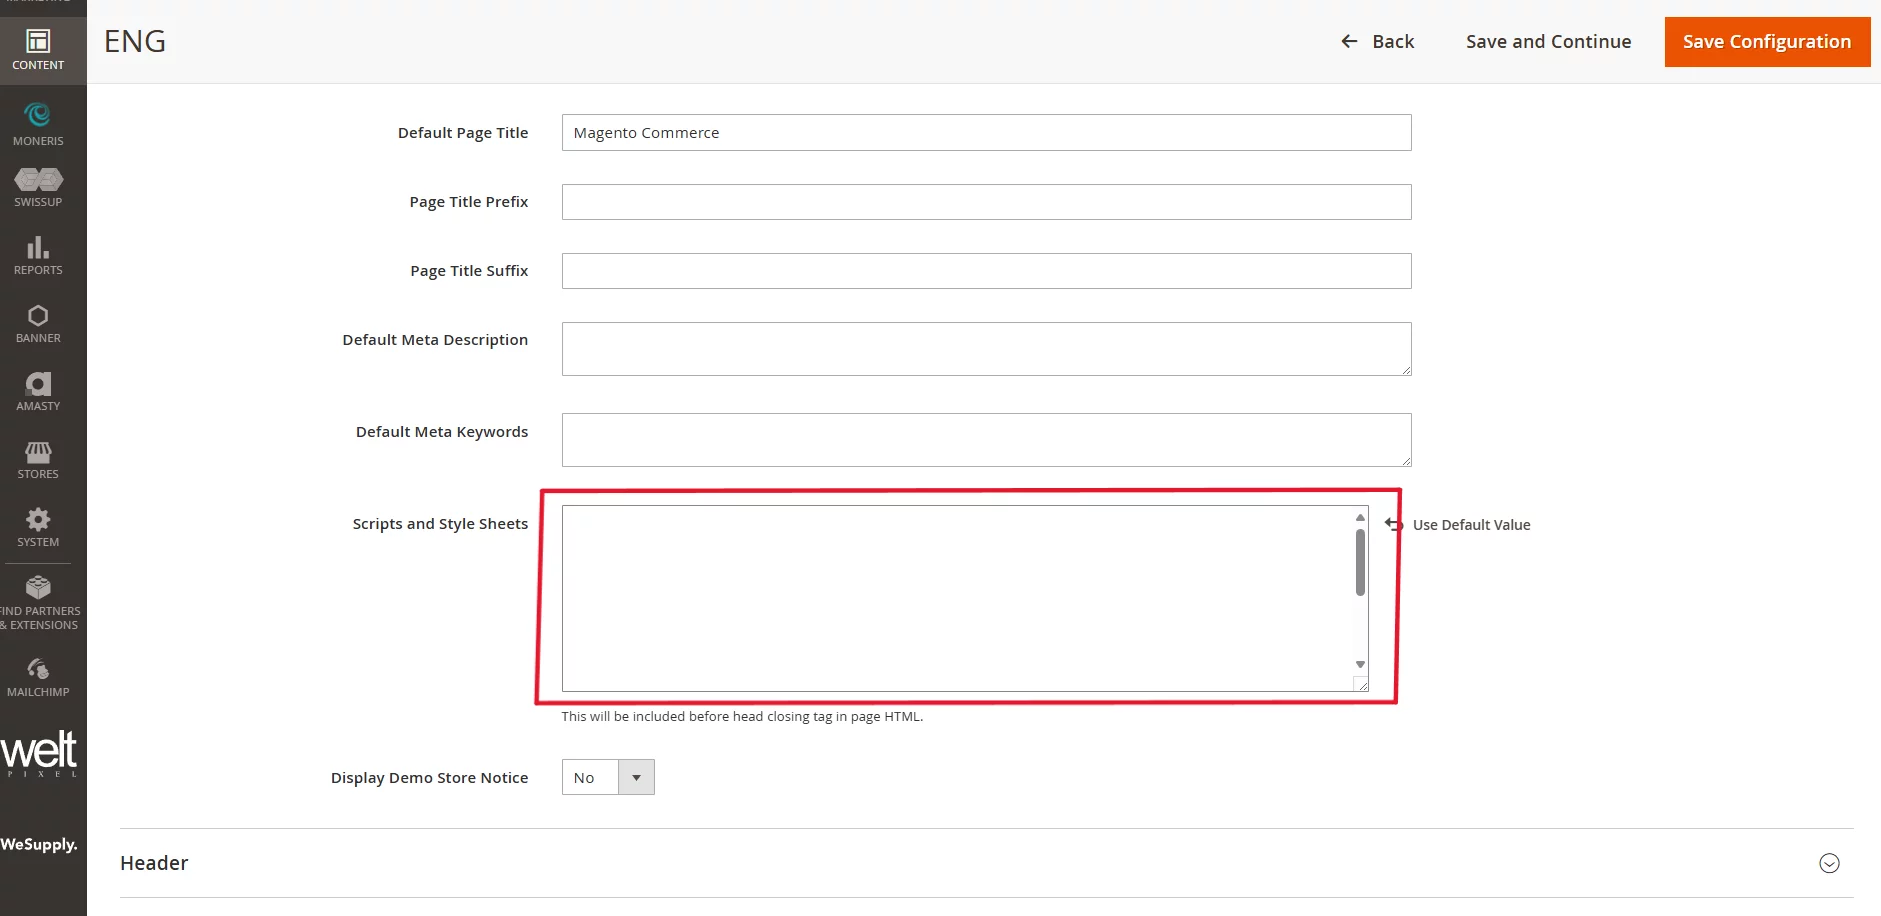
In order to accurately track the data from your website, you will need to add a snippet of code inside the head and a snippet of code inside the body tag. There are few ways of doing it extension being the easiest, or we can add it from the admin > content > theme config settings.
But since we care about doing a manual implementation let’s go with the most efficient and robust option. Adding head tag to from the admin and body tag into the code.

Adding GTM Snippet into the head section
Copy the snippet for head from your GTM container
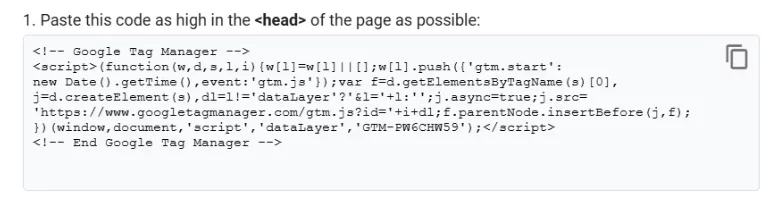
Adding the code in the head is pretty simple:
- Login to your Magento Admin
- Find the content tab from the side bar and navigate to content > design > configuration
- Edit the active theme and paste the code snippet for head section inside HTML Head > Script and Styles Sheet
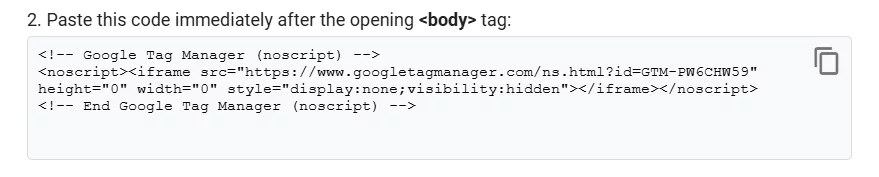
Adding GTM no script snippet inside the body
Google recommends adding this <noscript> snippet immediately after the opening of the body tag which cannot be managed from the admin panel. Though, if you want to do it from the admin panel, many in the Magento community suggest adding it in the Miscellaneous HTML found under content > design > configuration > active themes > Footer
However, it is worth noting that the above method is not the most reliable, and we would recommend adding the snippet tag directly into the default layout file or a custom module file.
Step 1: Navigate to your ‘default.xml’ Layout File
Since we are going to create a dedicated module, we will be creating a default.xml file inside the module folder in the following path view/frontend/layout
Step 2 Insert a Reference Container for noscript tag in default layout
Open default.xml and add the GTM <noscript> tag just after the opening <body> tag
Step 3 Create the gtm.phtml File
Create a new file named gtm.phtml in view/frontend/templates/html
And add the <noscript> tag you find in GTM dashboard in that file.
Deploy the Static files and Clear the caches
First run the command to deploy the static files then run the commands to clear the caches
Verify GTM Installation
Check Your Website:
- Open your website and view the source code (Right-click > View Page Source).
- Ensure that both the GTM <script> and <noscript> tags are present in the correct locations.
Awesome!! Now you are ready to connect your GA4 with Google Tag Manager
Creating a GA4 Configuration Tag in GTM
GA4 configuration tag enables the connection between your GTM container and in other words setting up this tag will enable GA4 tracking on your website.
1. Open your GTM container then navigate to Tags > New
2. Choose Google Tag
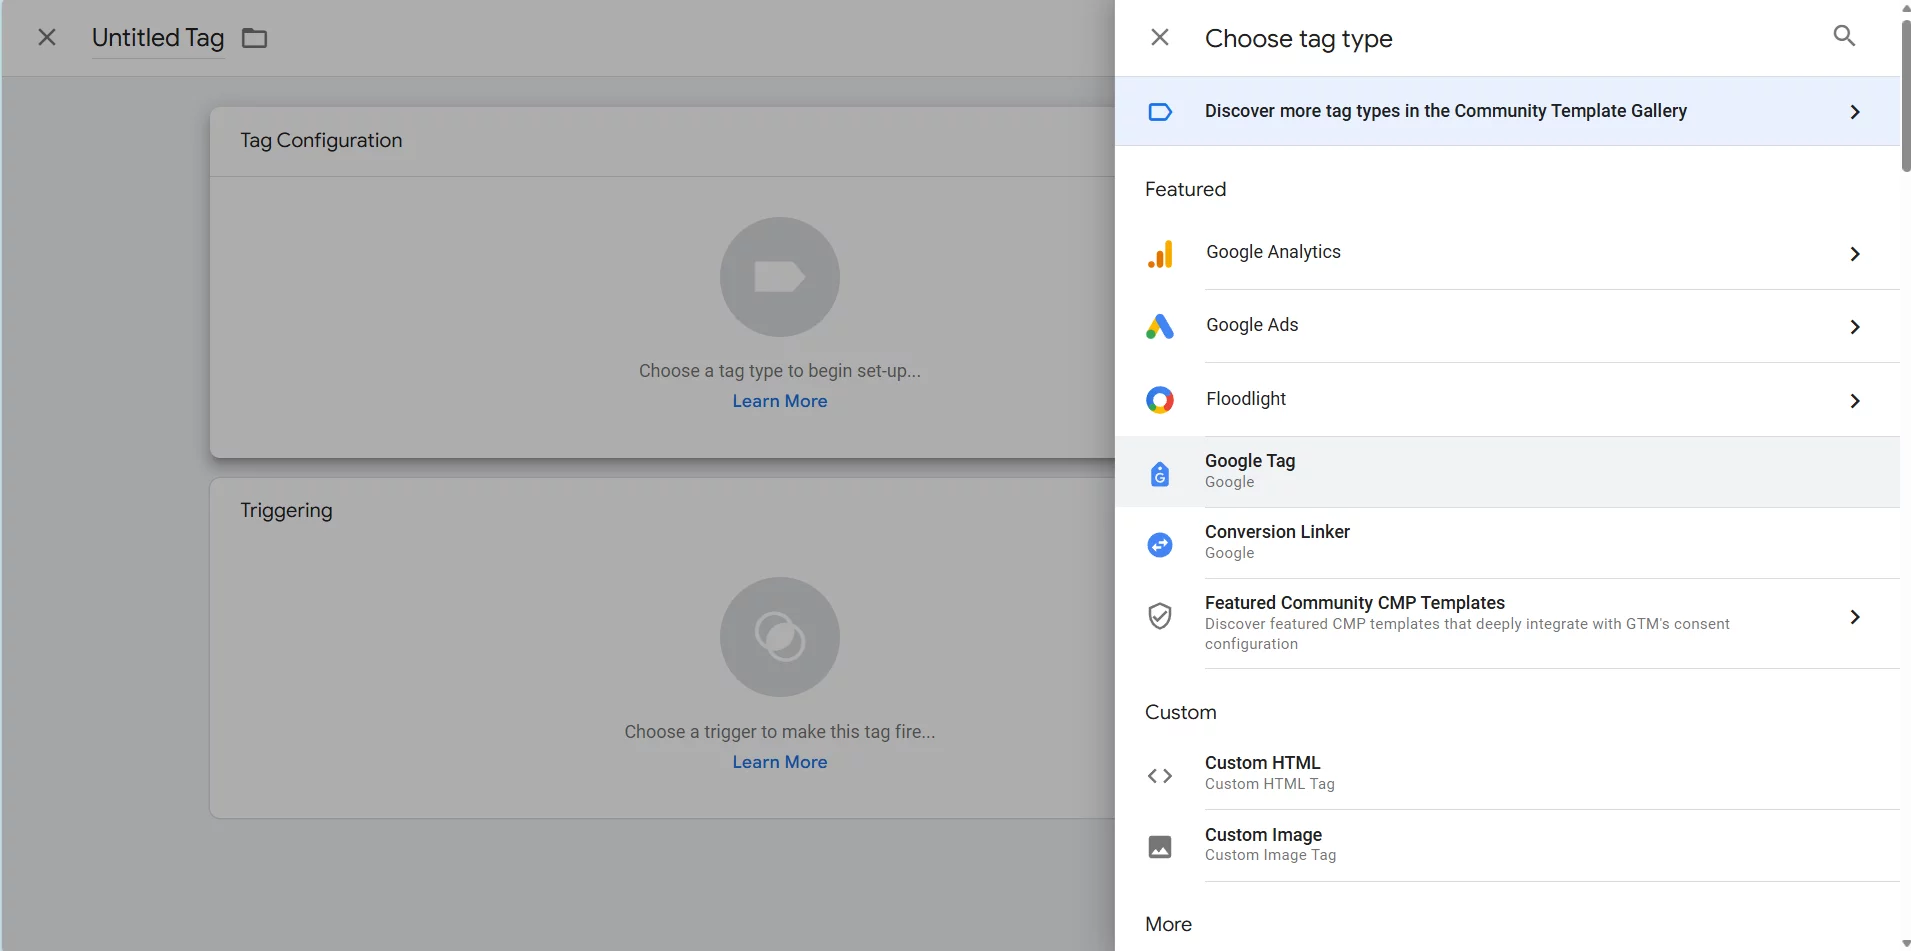
3. Enter your GA4 Measurement ID (found in your GA4 data stream settings)
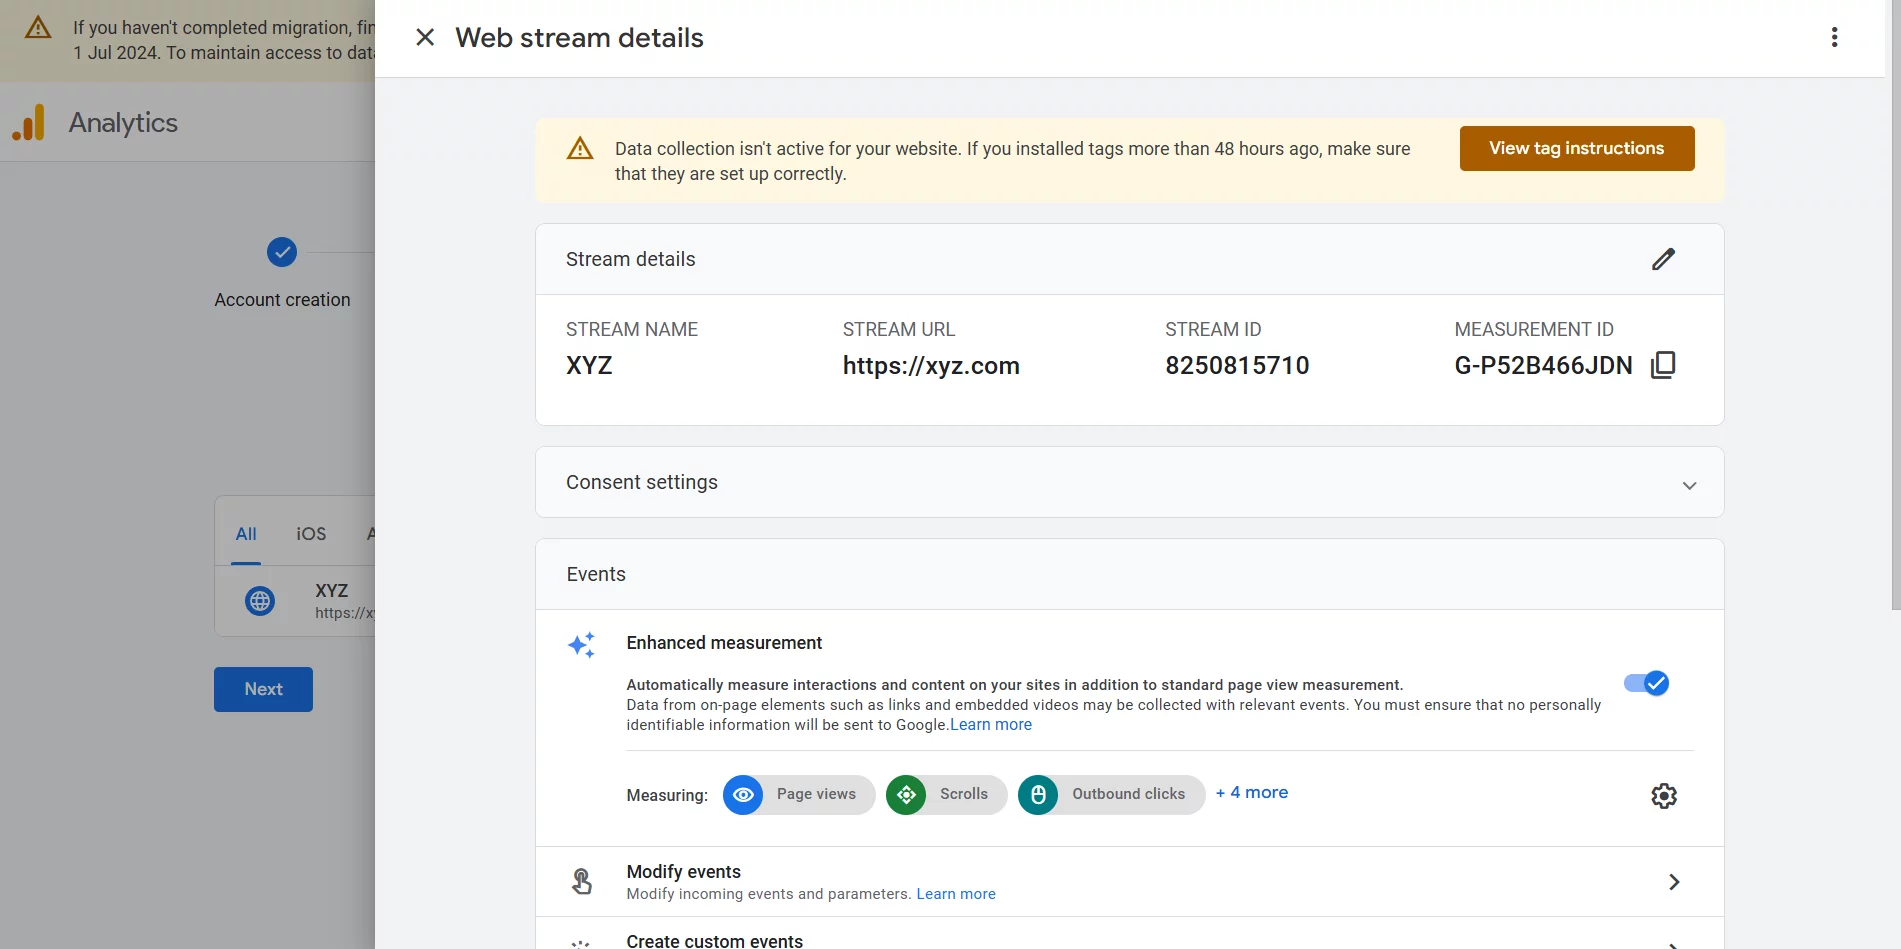
4. Create configuration parameter under configuration settings as shown in the below image
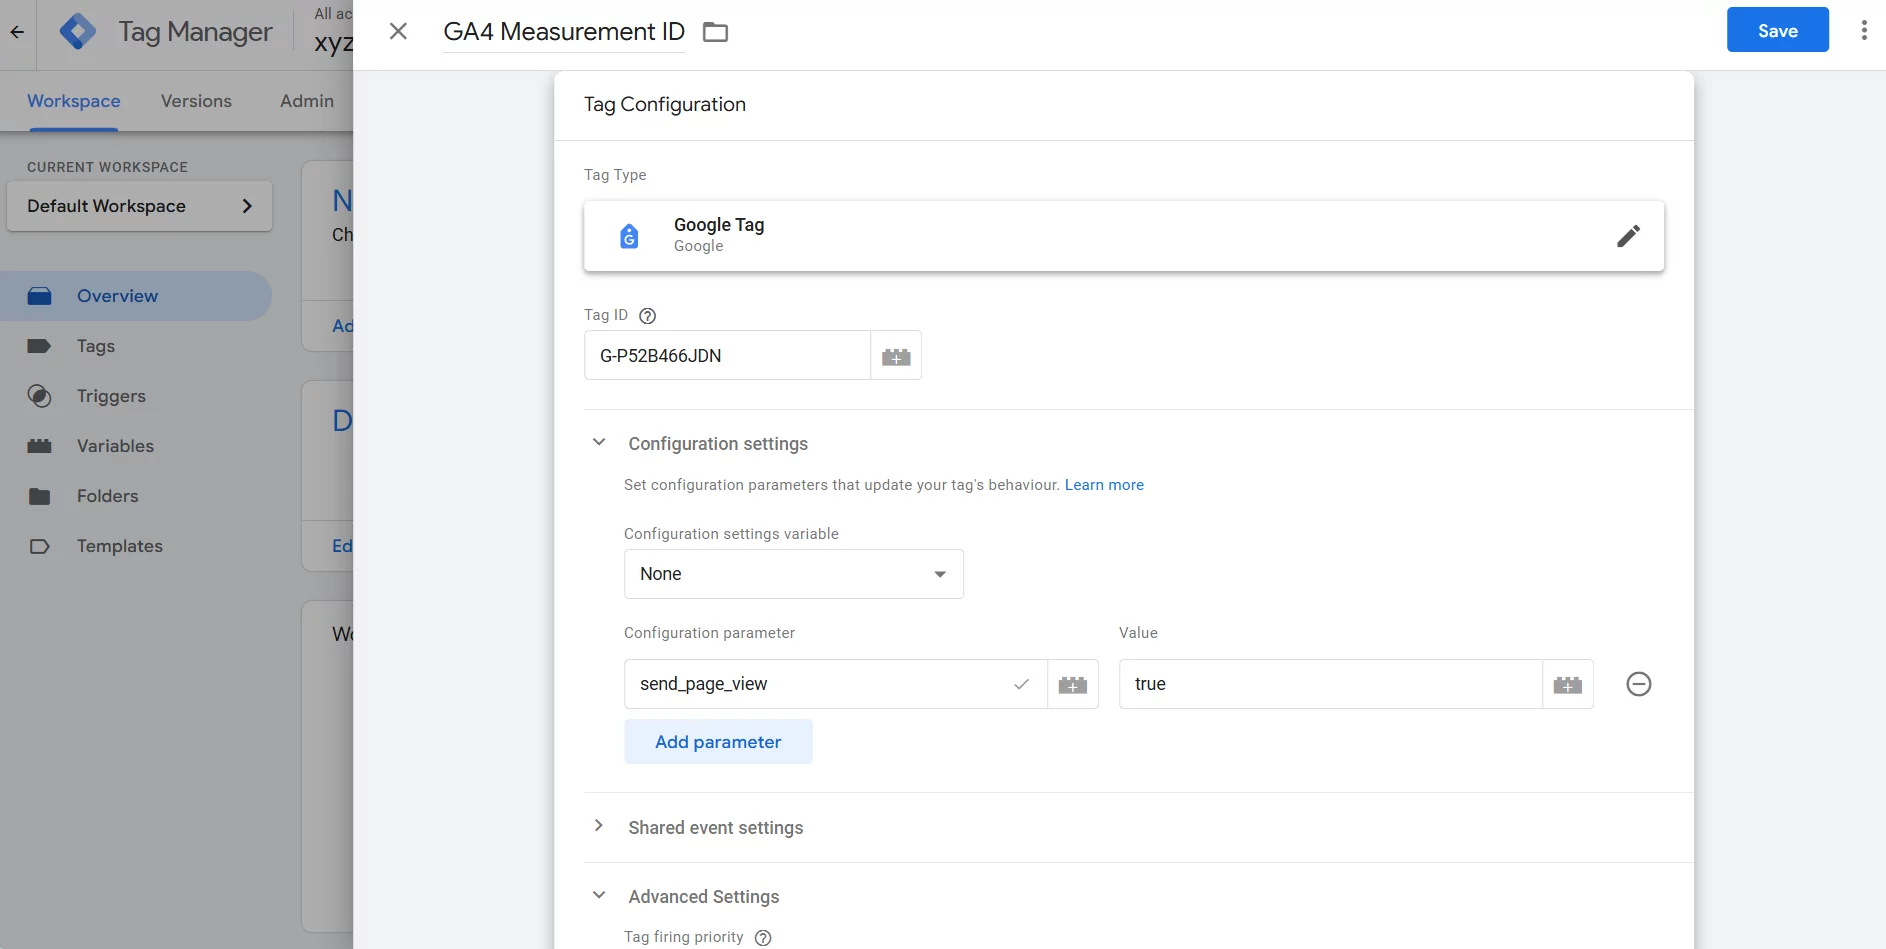
Save the tag and name it appropriately.
Hurray🎉🎉 You have successfully set up the GA4 tag on your Magento website. Now you should be able to view the traffic of your Magento 2 store in Google Analytics.
Now let’s continue with the real exciting part, setting up Google recommended events.
Setting Up Ecommerce Tracking
Google’s Recommended Ecommerce events
Google has provided a list of recommended events that might be added to an ecommerce site for comprehensive tracking via GA4. However, we will not dive into all of them in this article to keep the length of the manageable, rather we will only focus on four core events for all e-commerce businesses which are
- View Product
- Add To Cart
- Checkout
- Purchase
If you want to find out learn more about the recommended event, you can refer to the following documentation by google
Creating Essential Variables
There are multiple steps that you need to take in GTM in order to pass the data from dataLayers to GA4. But setting up variables for commonly used values can make our life much easier. This is how you create the variables
Variable For Measurement ID
Creating a variable for measurement ID is not essential but it is very convenient, efficient and will be required in each of the events.
1. Go to GTM Dashboard select Variables tab from the sidebar
2. Create new user defined variable
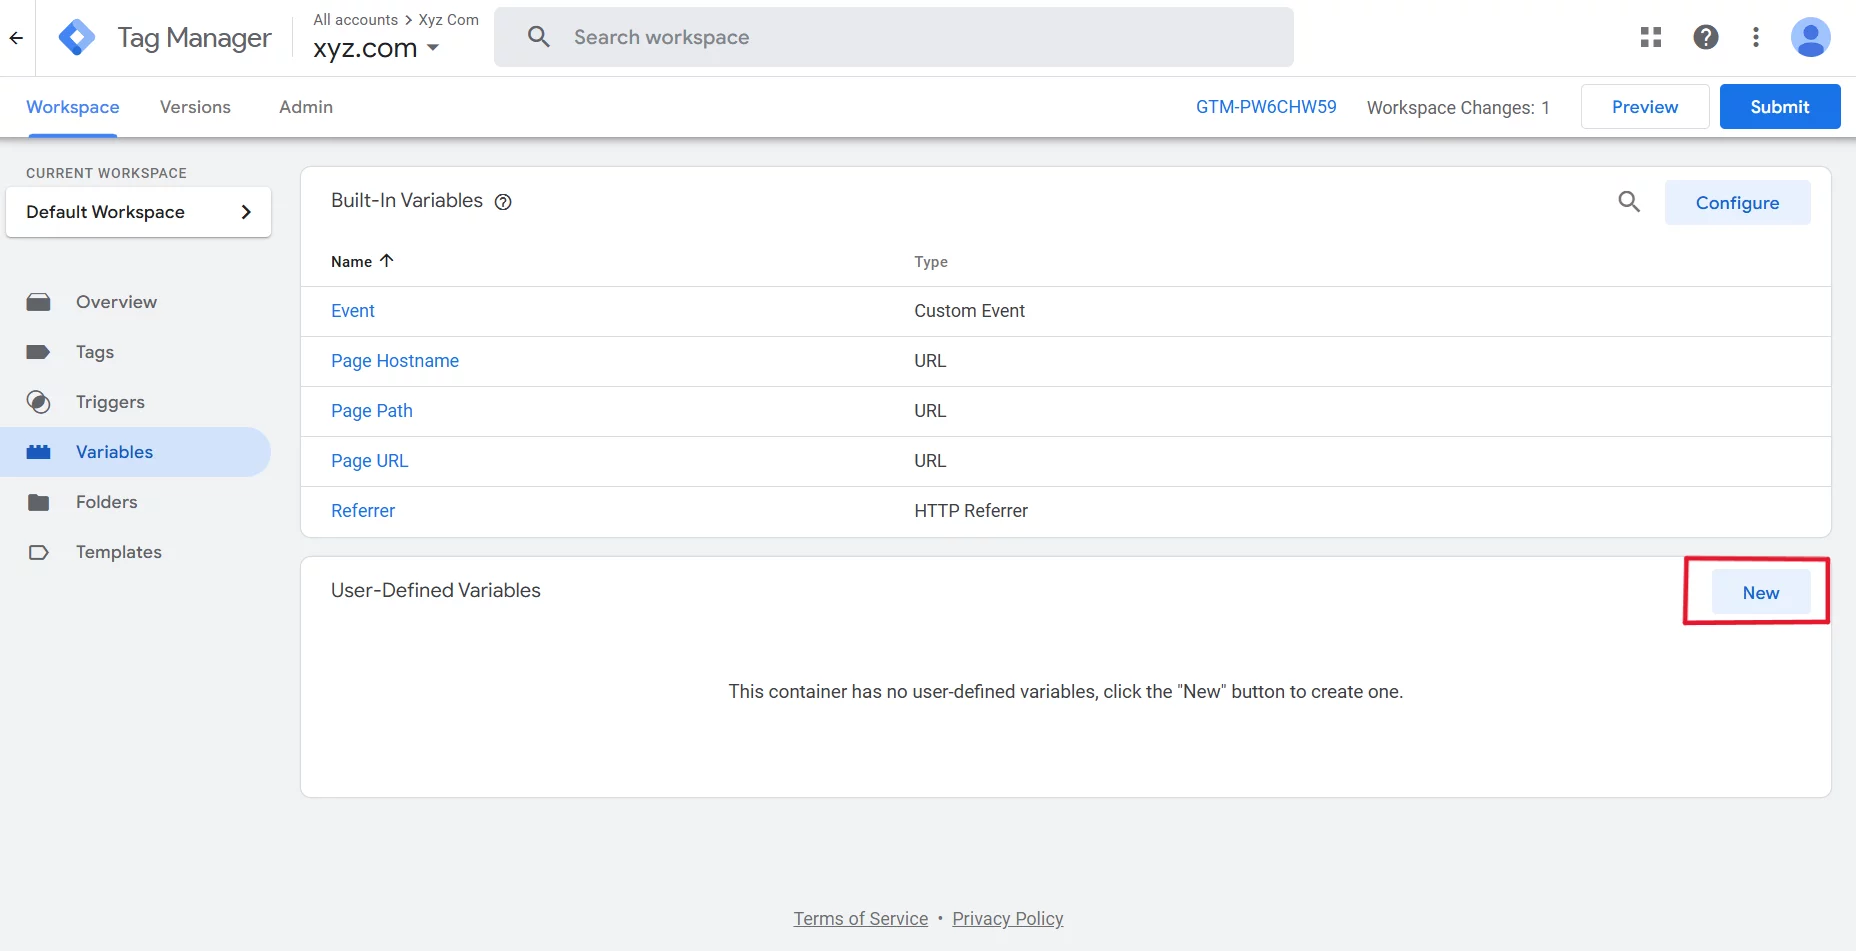
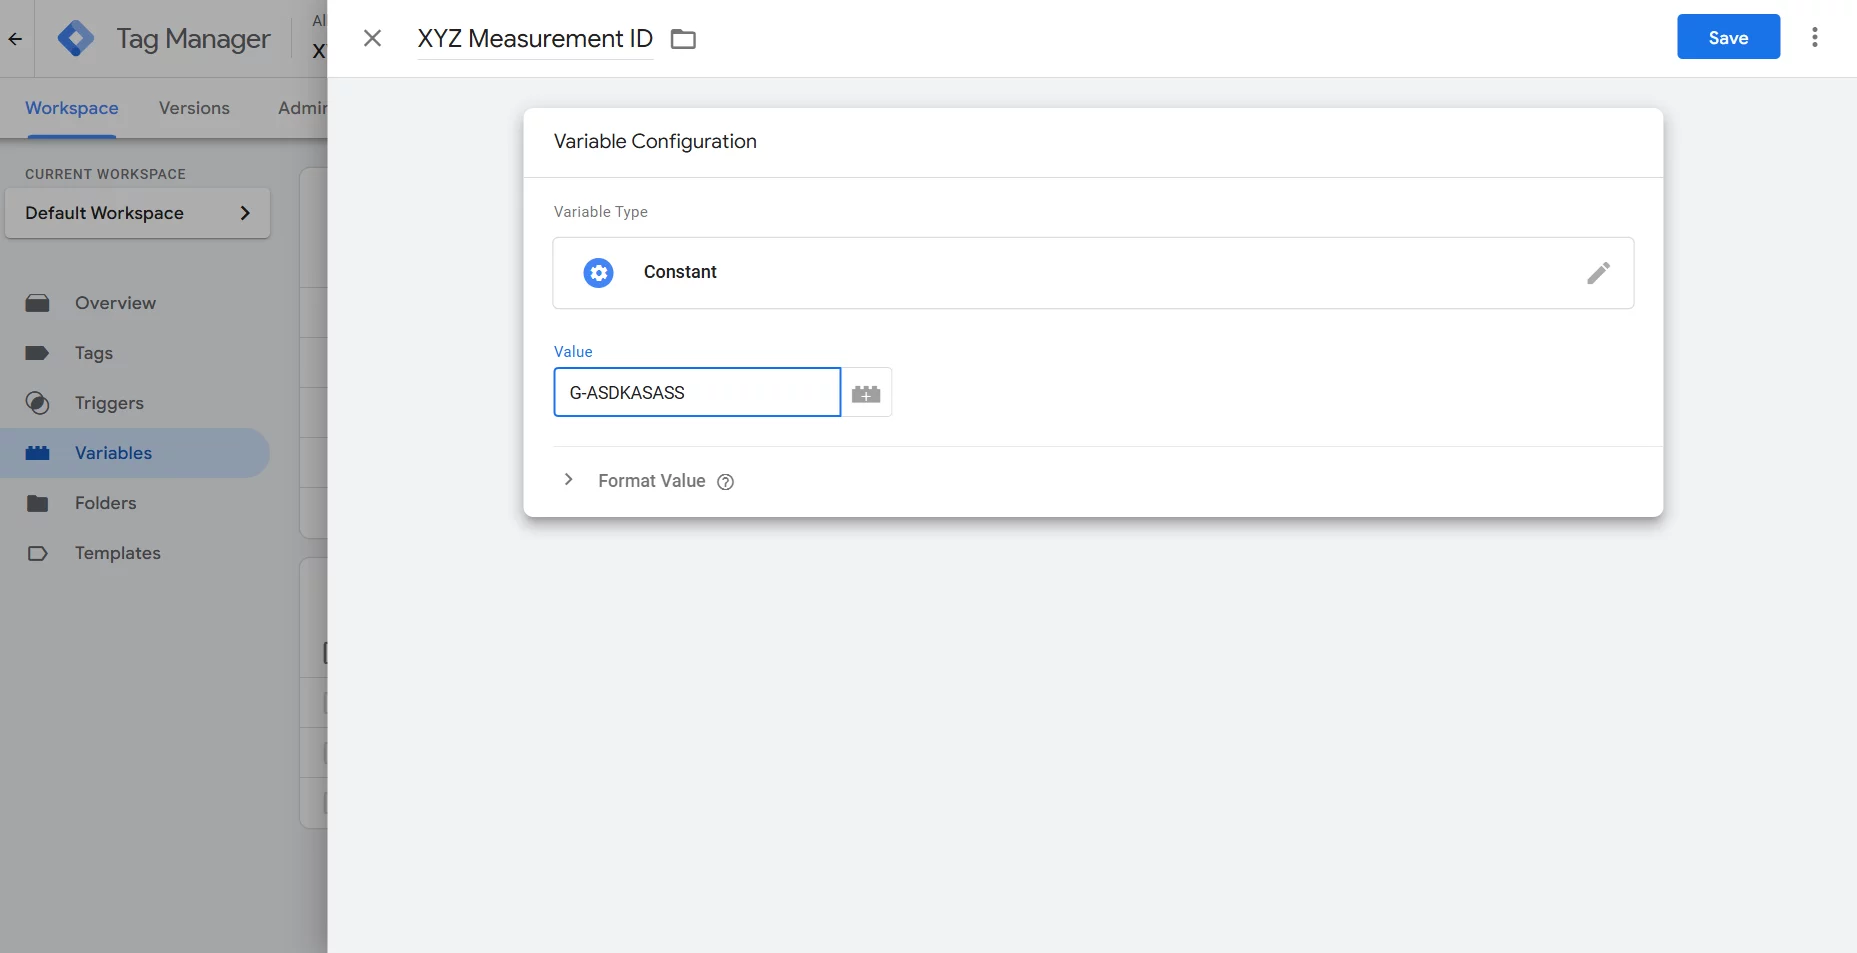
3. Select Variable Configuration > Utilities > Constant
4. Add the measurement ID found in your GA4 under the data stream
5. Add name of the Variable, and Save
Creating dataLayer Variables
The good thing about GA4 is that it has a very flat structure, so you will need to define fewer variables and it is way easier to manage,
We will need to create a variable for currency, value and items data. It is very easy to do in the google tag manager
So, like we did in the last time,
Go to GTM Dashboard > Variables from the sidebar
Create a new user defined variable
Then click variable Configuration > Data Layer Variable
Configure Variable as follows
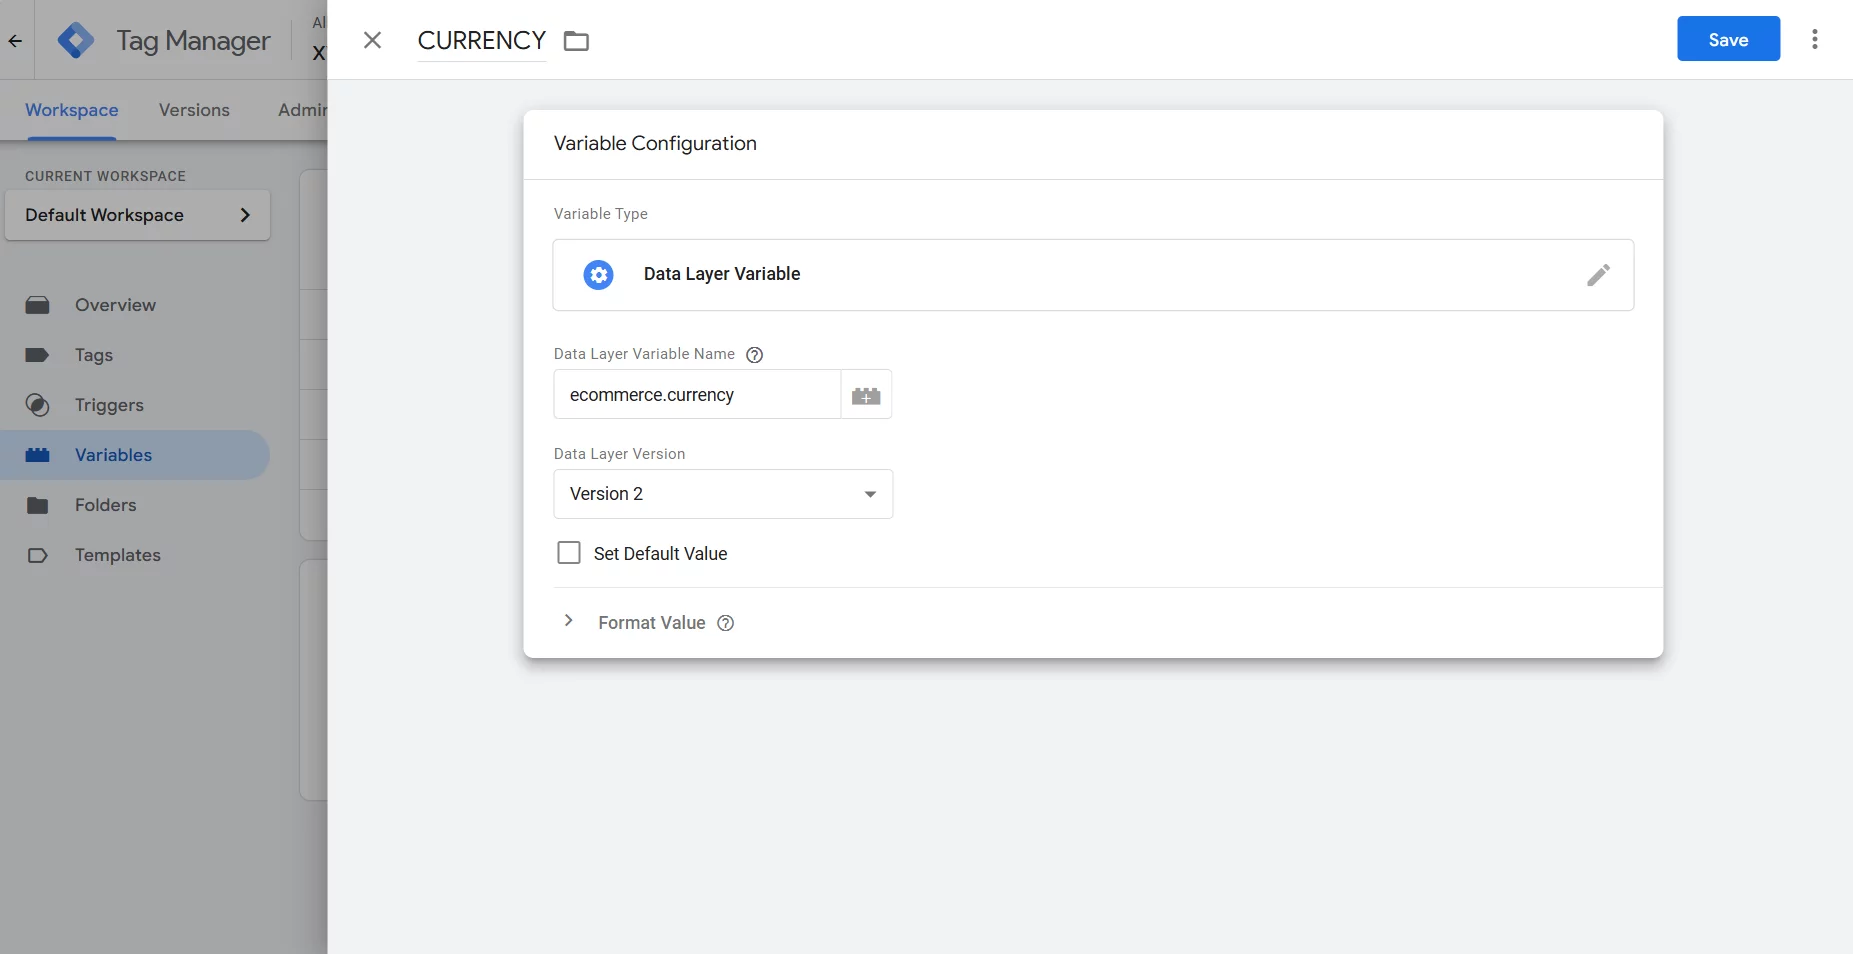
- Under the “Data Layer Variable Name” should be exactly how it is defined in the data layer. In our case for currency, it would be
- Data Layer Variable Name – “ecommerce.currency”
- Variable Name “CURRENCY” (you can choose any name that you want, but make sure it is unique and recognizable)
- Save the setting
We will do same for the other other dataLayer variables that will be used in setting up the ecommerce events later in the articles:
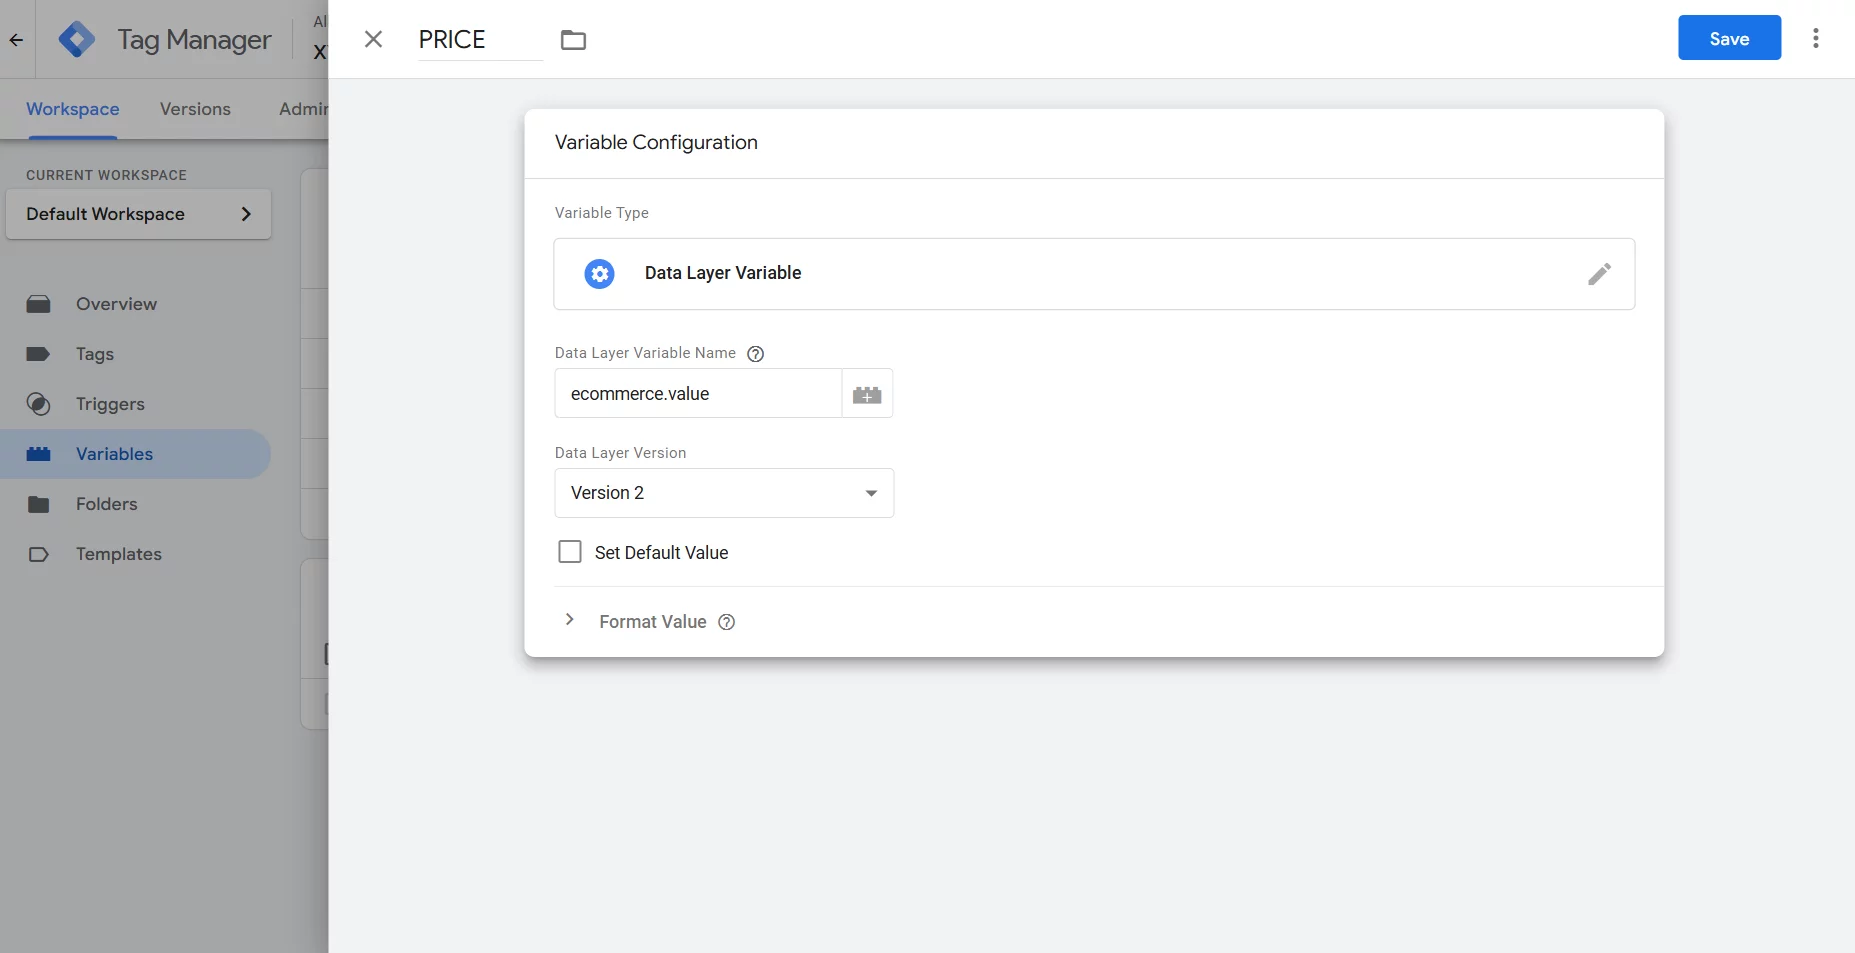
Data layer variable config for “Value”
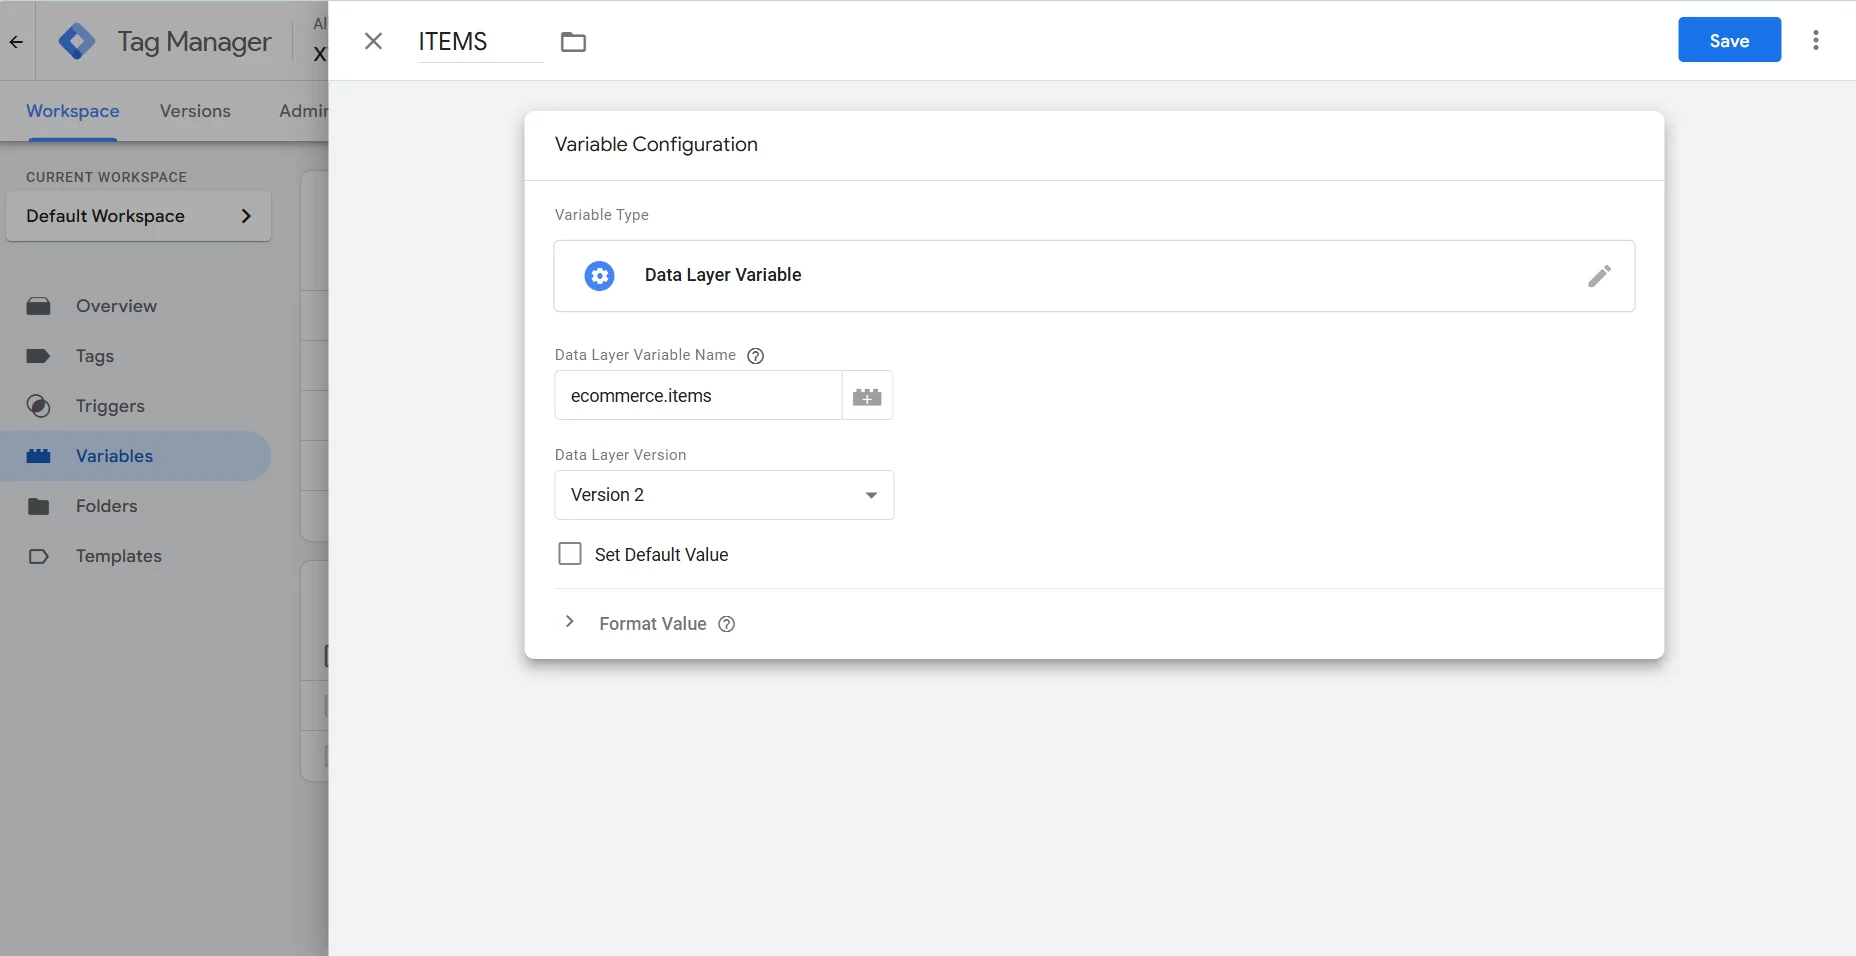
Data layer variable for “items”
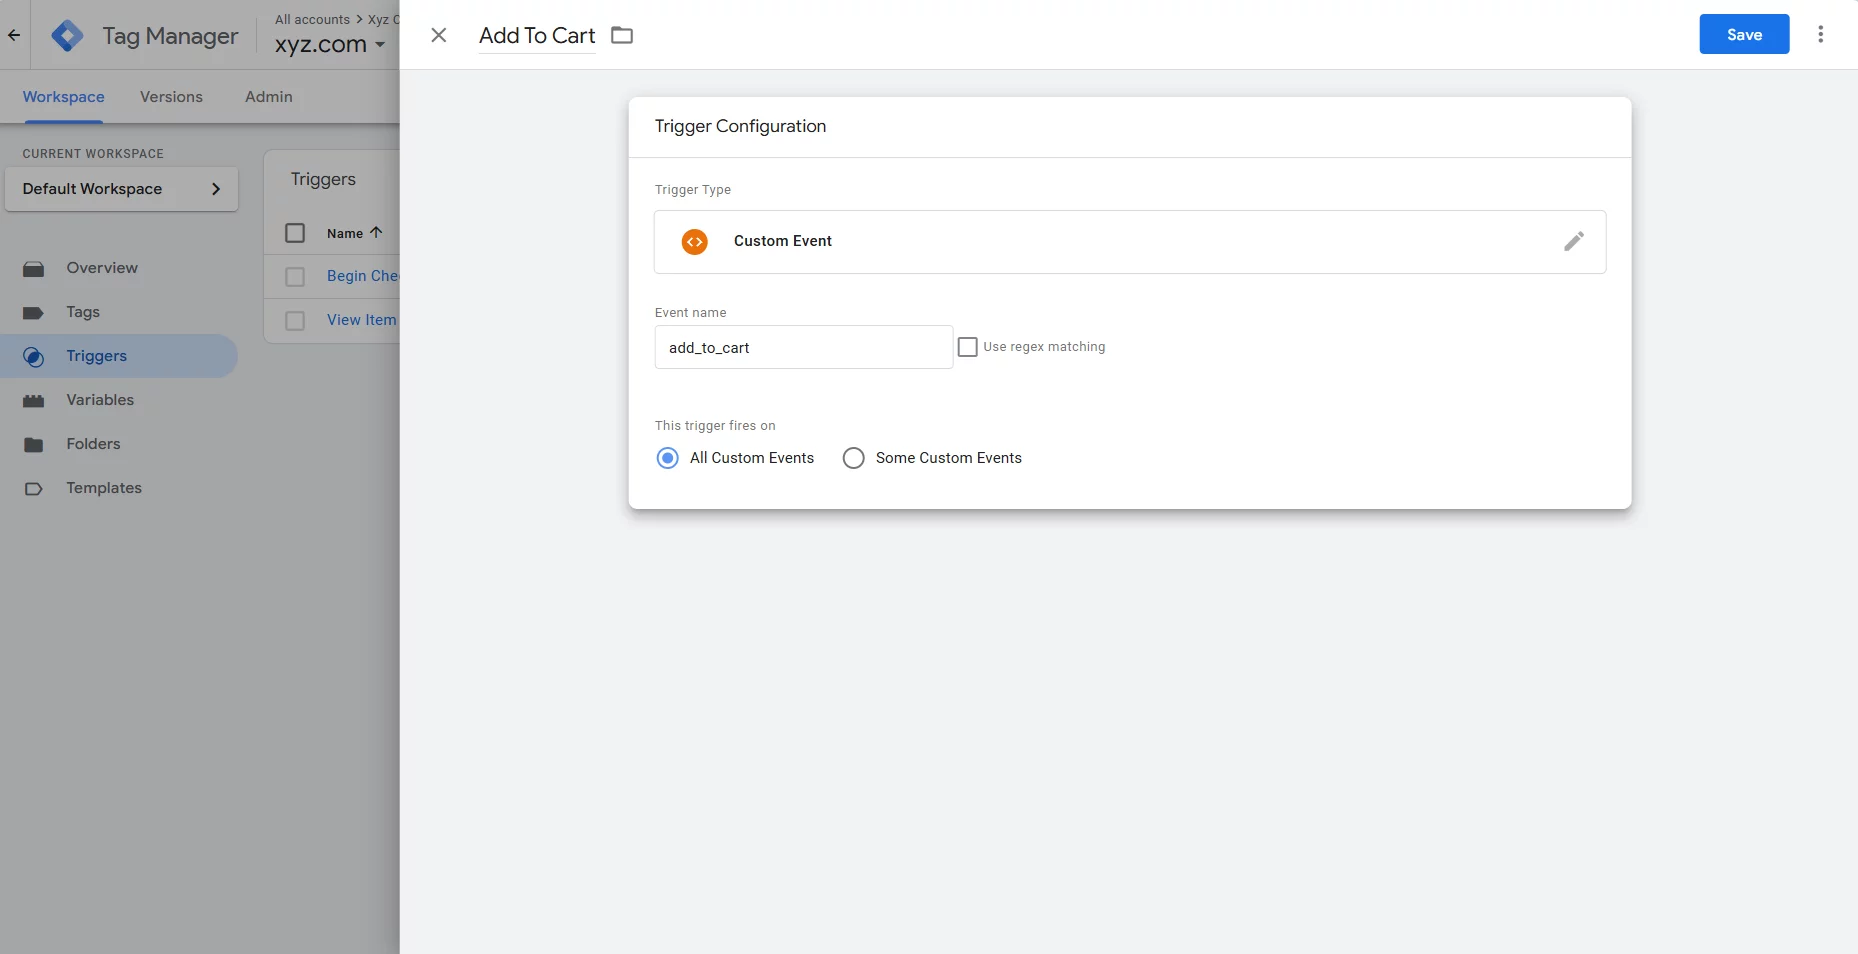
Creating Custom Triggers for Events
We need to create custom triggers which will watch for a dataLayer event to happen and once it happens it fires the GTM event.
We need to create a custom trigger for each of the events, but it is pretty simple.
Navigate to triggers from the sidebar of your GTM container
Now click on New > Trigger Configuration
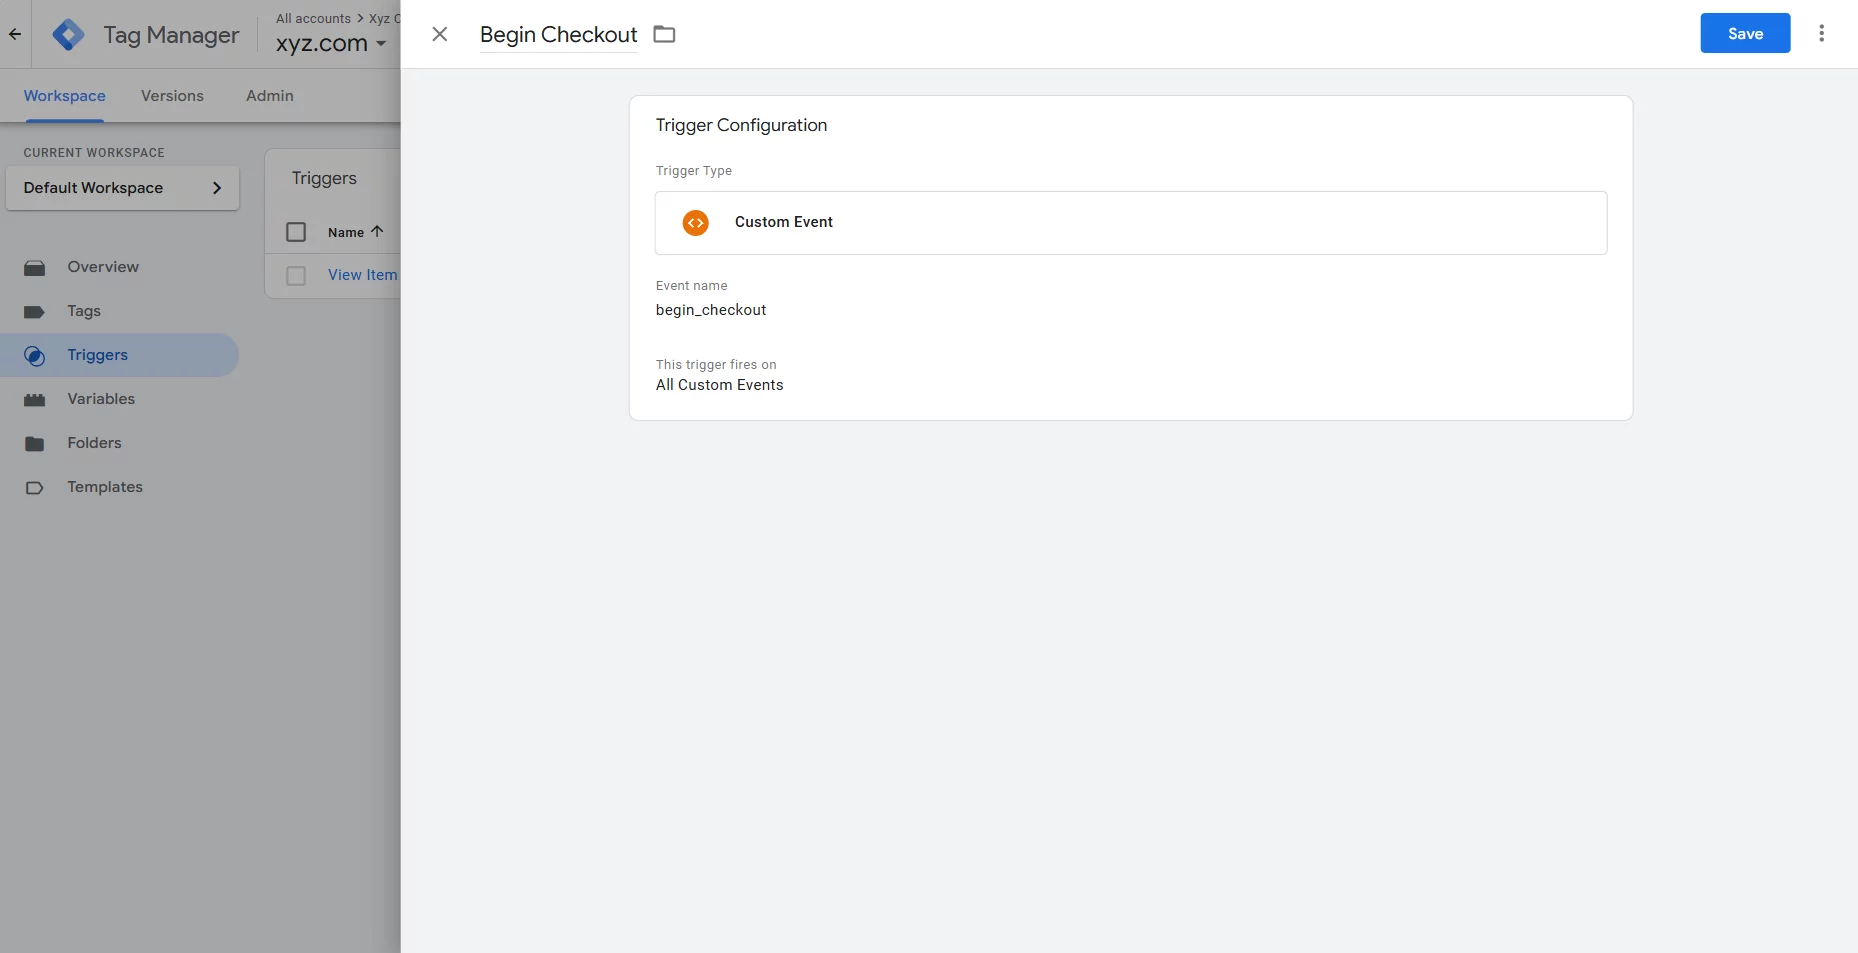
Then from the sidebar navigate to Other > Custom Trigger
In Custom Trigger add event name exactly as defined in the dataLayer.
Not at last give a meaningful name to the trigger and save.
For this blog we will need to create triggers for 4 events, i.e.
- view_item,
- add_to_cart,
- begin_checkout,
- purchase
You can refer to the slider below


Tracking Product View (view_item)
Add Data Layer in for view_item
Create catalog_product_view.xml, inside view/frontend/layout and paste the following code
Create the Template File
In your custom module or theme, create view_item.phtml if you are building along with us place it inside view/frontend/templates/datalayer
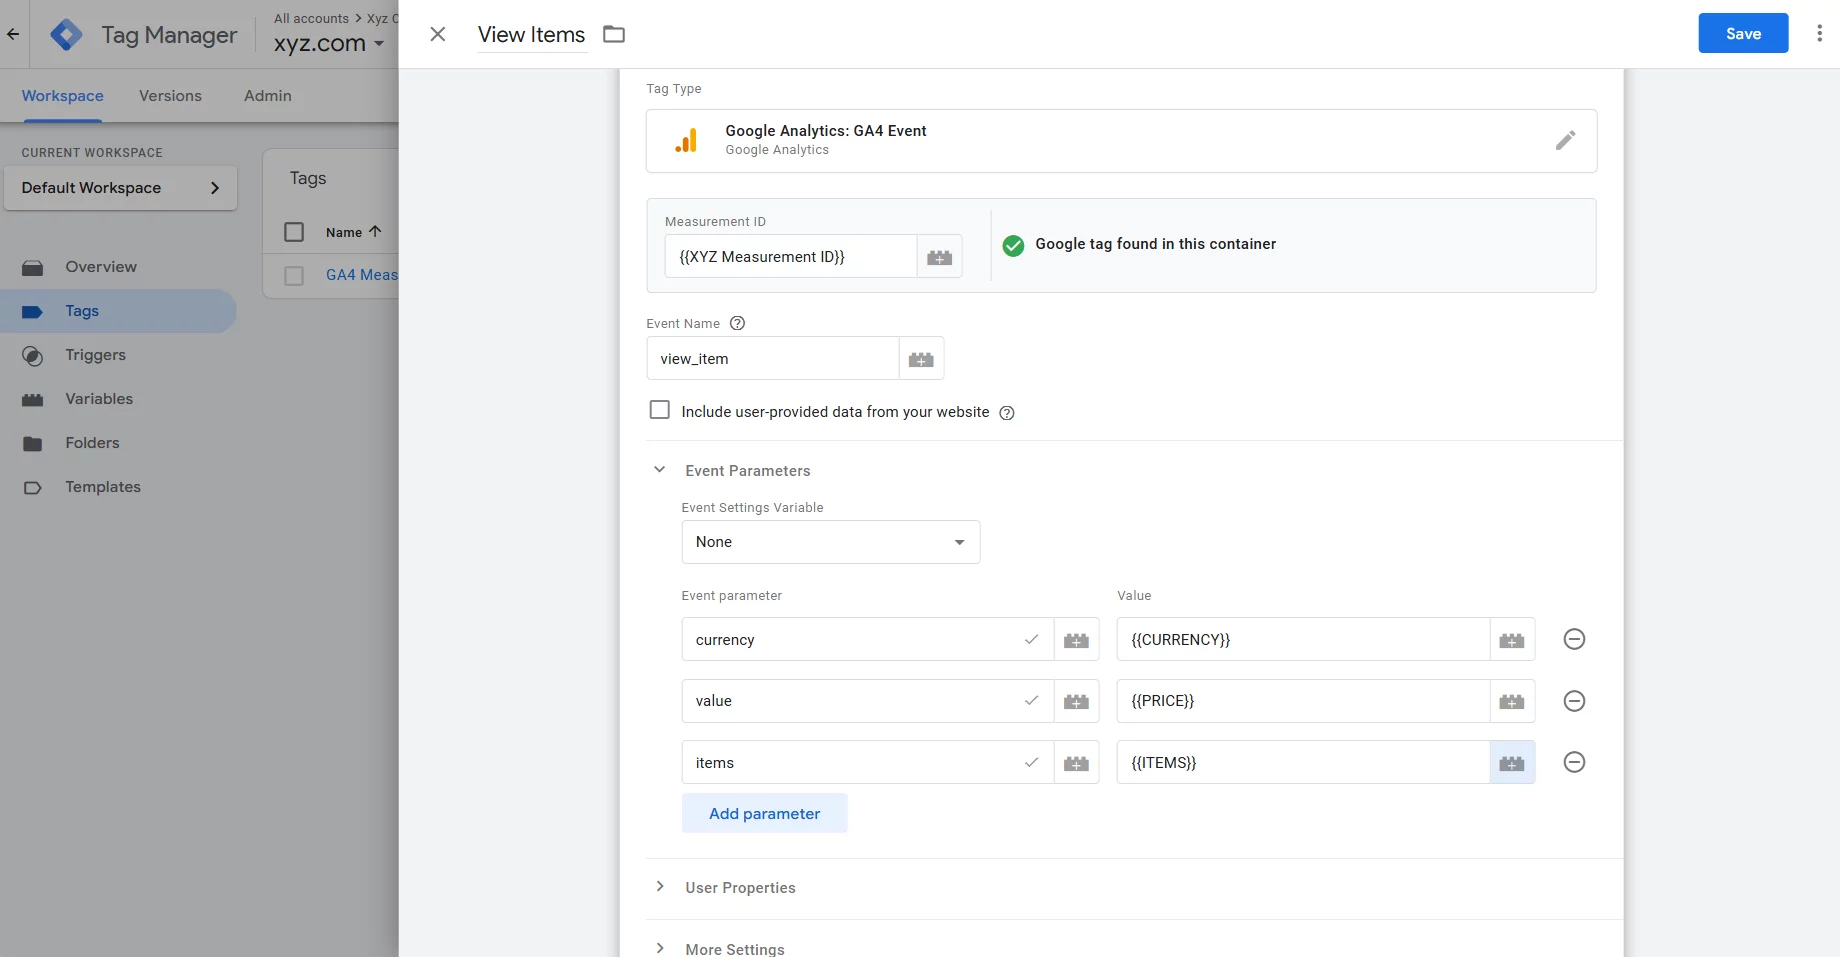
Create an event in GTM to capture view_item even
Goto from GTM dashboard, sidebar > Tags > New
Tag Configuration: Google Analytics > Google Analytics: GA4 Event
Add the GA4 Measurement ID
Event Name: view_item (it has to be exactly as defined in dataLayer)
Add Event Parameters, set variables created in previous step as a value for each parameter
- currency: {{CURRENCY}}
- value: {{PRICE}}
- Items: {{ITEMS}}
Set trigger to custom event for View Item
Tracking Add To Cart (add_to_cart)
Caution: Make sure you have basic knowledge of Magento in order to proceed further, these steps might break some core functionality if not done correctly.
Modify add-to-cart.js
Modify the JavaScript handling the add-to-cart functionality to include a data layer push. Magento 2 uses AJAX to handle add-to-cart actions. You can extend or override the default Magento JavaScript to include the data layer push.
Create a RequireJS Mixins File
Create a custom RequireJS mixin to extend the functionality of the default add-to-cart process.
Create requirejs-config.js inside view/frontend
Create the Mixin JavaScript
Extend the catalog-add-to-cart JavaScript file to push the add_to_cart event to the data layer.
Create catalog-add-to-cart-mixin.js inside view\frontend\web\js
Deploy the Changes
Create an event in GTM to capture add_to_cart event
Setting up all the events will be pretty similar to what we did in the last view_product event. Let’s quickly look into it.
We will not need to create any new variable for this event, as it only requires the variables created in the last step i.e. currency, value, and items.
Checkout the following image and configure it similarly:
Add Event Parameters:
- currency: {{CURRENCY}}
- value: {{PRICE}}
- Items: {{ITEMS}}
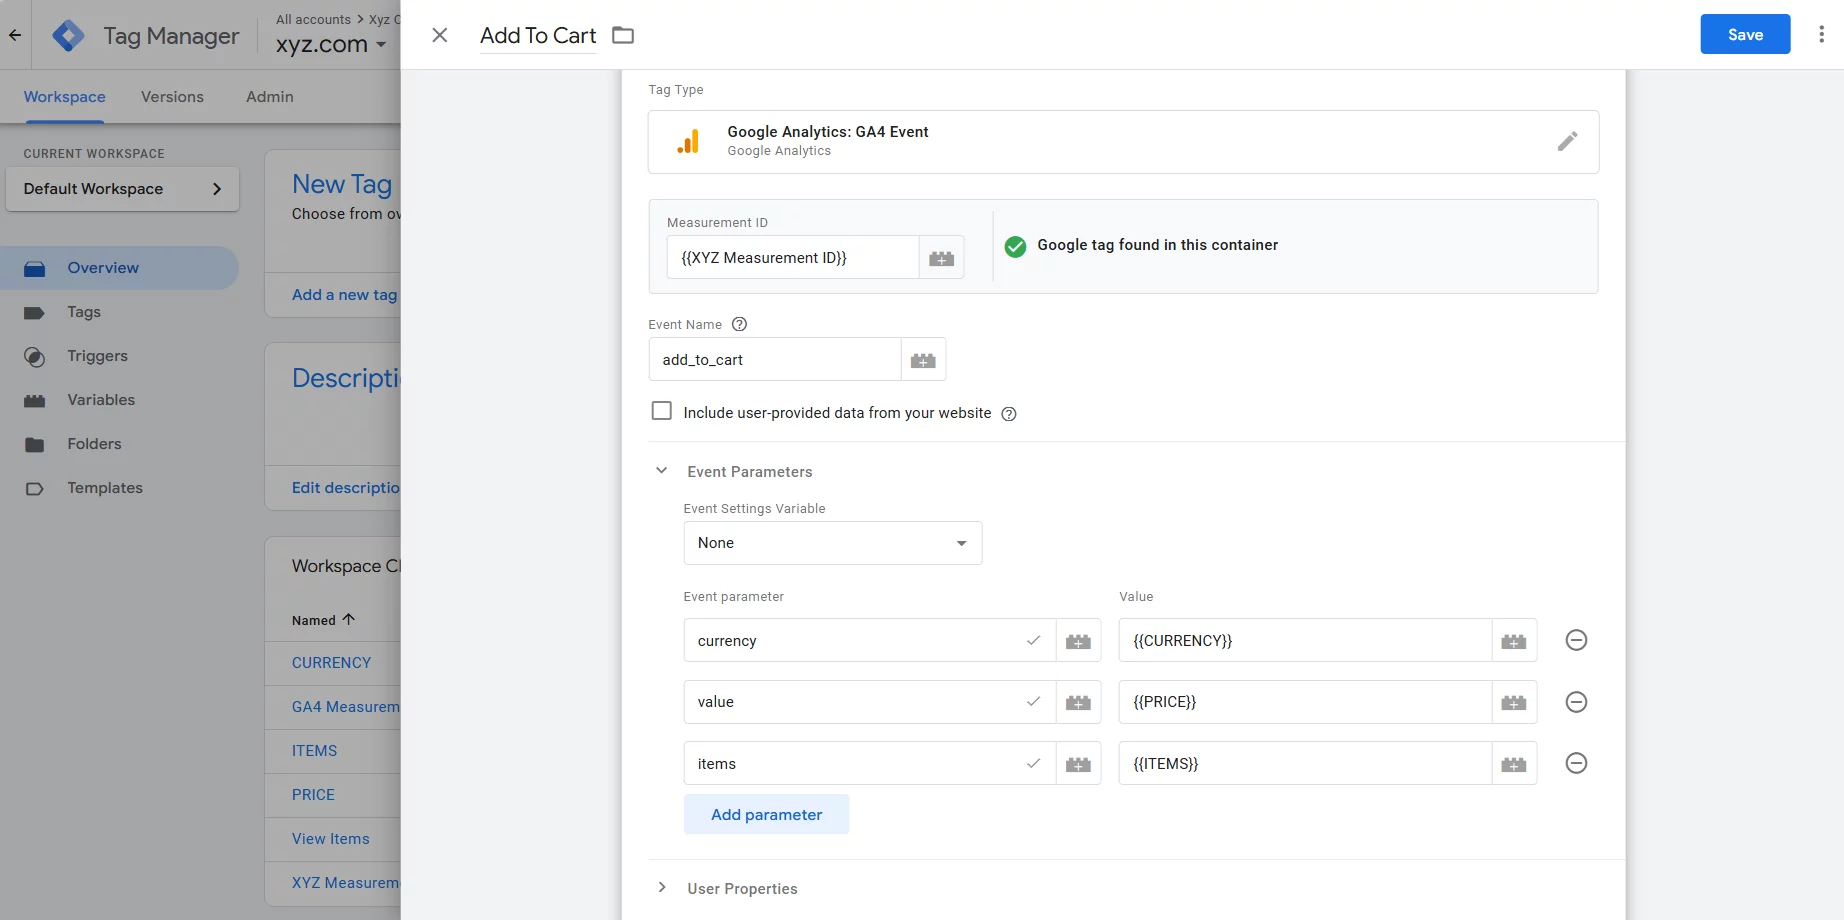
Set the custom trigger we created earlier for Add to Cart
Tracking Checkout (begin_checkout)
Add Data Layer in Magento 2 Theme
Create a checkout_index_index.xml file inside view/frontend/layout
Create Template File
In your custom module create “begin_checkout.phtml” inside view/frontend/templates/datalayer and add the following snippet
Creating a Tag in Google Tag Manager
By this time, I think you should be pretty familiar with the drill. Still, checkout the following image for tag configuration
Add Event Parameters:
- currency: {{CURRENCY}}
- value: {{PRICE}}
- Items: {{ITEMS}}
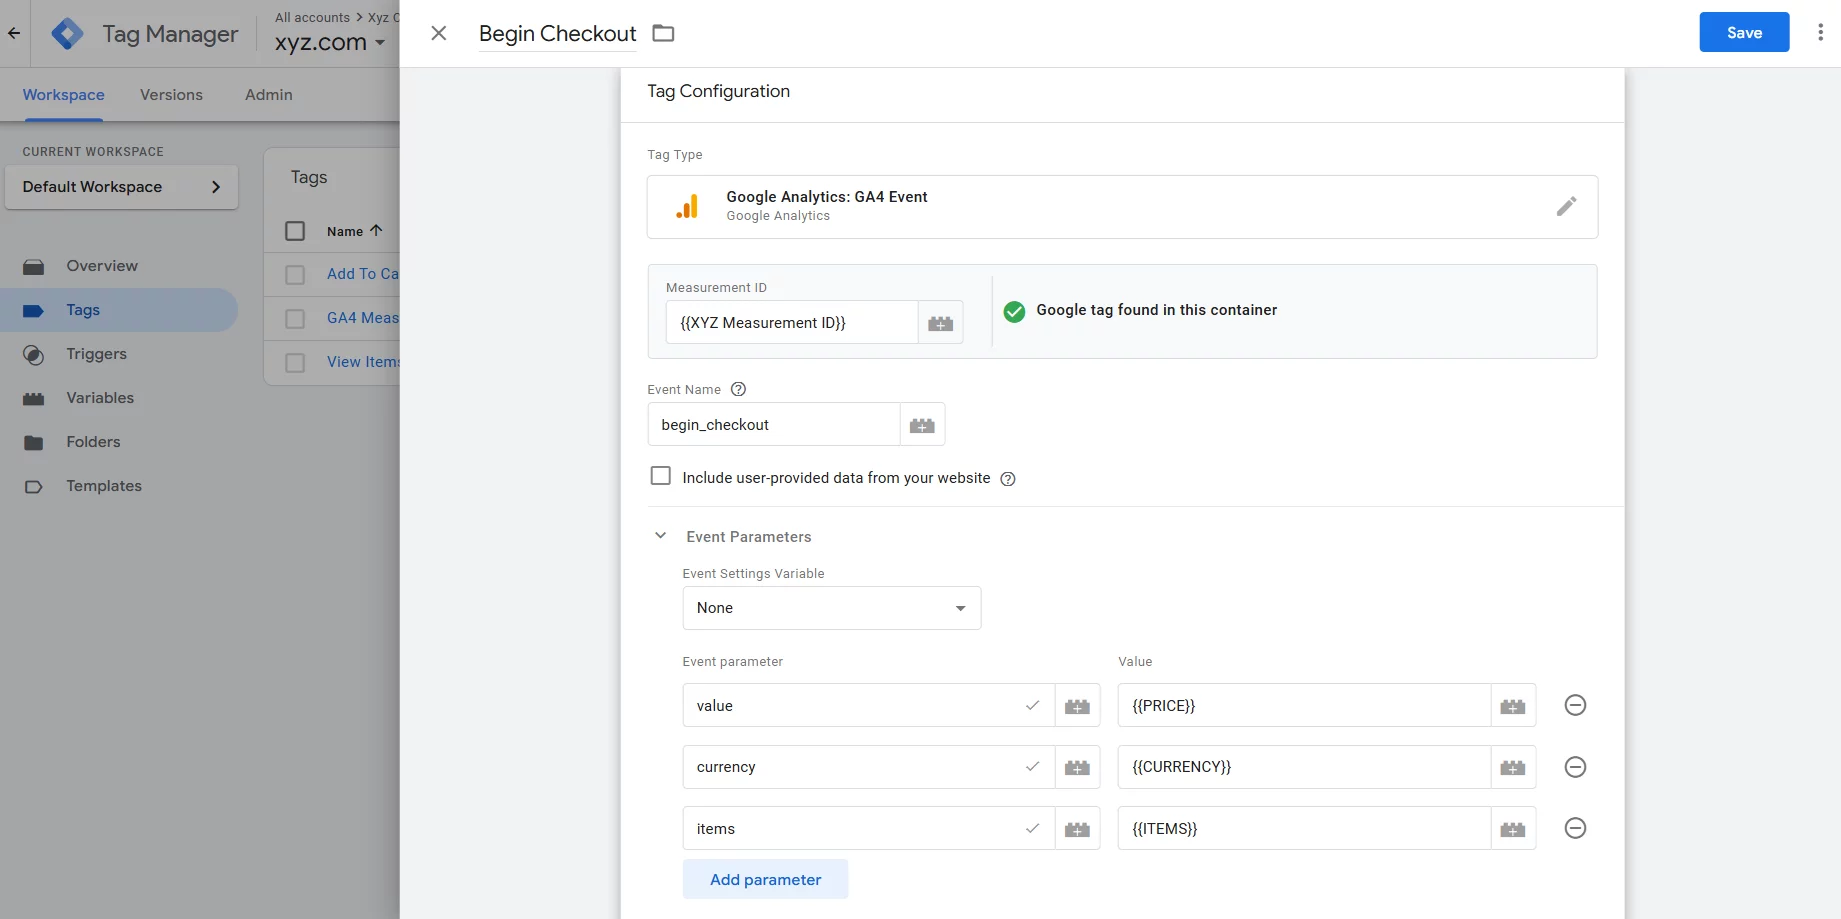
Set the custom trigger for Begin Checkout
Tracking Purchase (purchase)
Fetching Purchase Data
Create a file Gtm.php to fetch purchase data, in your module inside Block/Onepage
Add Data Layer in Success.phtml file
Success page is slightly unique don’t need to create a reference block unlike the previous flows. You can directly add the snippet in the success.phtml which needs to be inside view/frontend/templates/checkout.
Create a for purchase event in Google Tag Manager
As you might have guessed, setting up purchase event is pretty similar to previous events, all thanks to the flat structure GA4 specifications. Just need to pass one additional value of transaction id.
Configure the tags as per the following image:
Add Event Parameters:
- transaction_id: {{TRANSACTION ID}}
- currency: {{CURRENCY}}
- value: {{PRICE}}
- Items: {{ITEMS}}
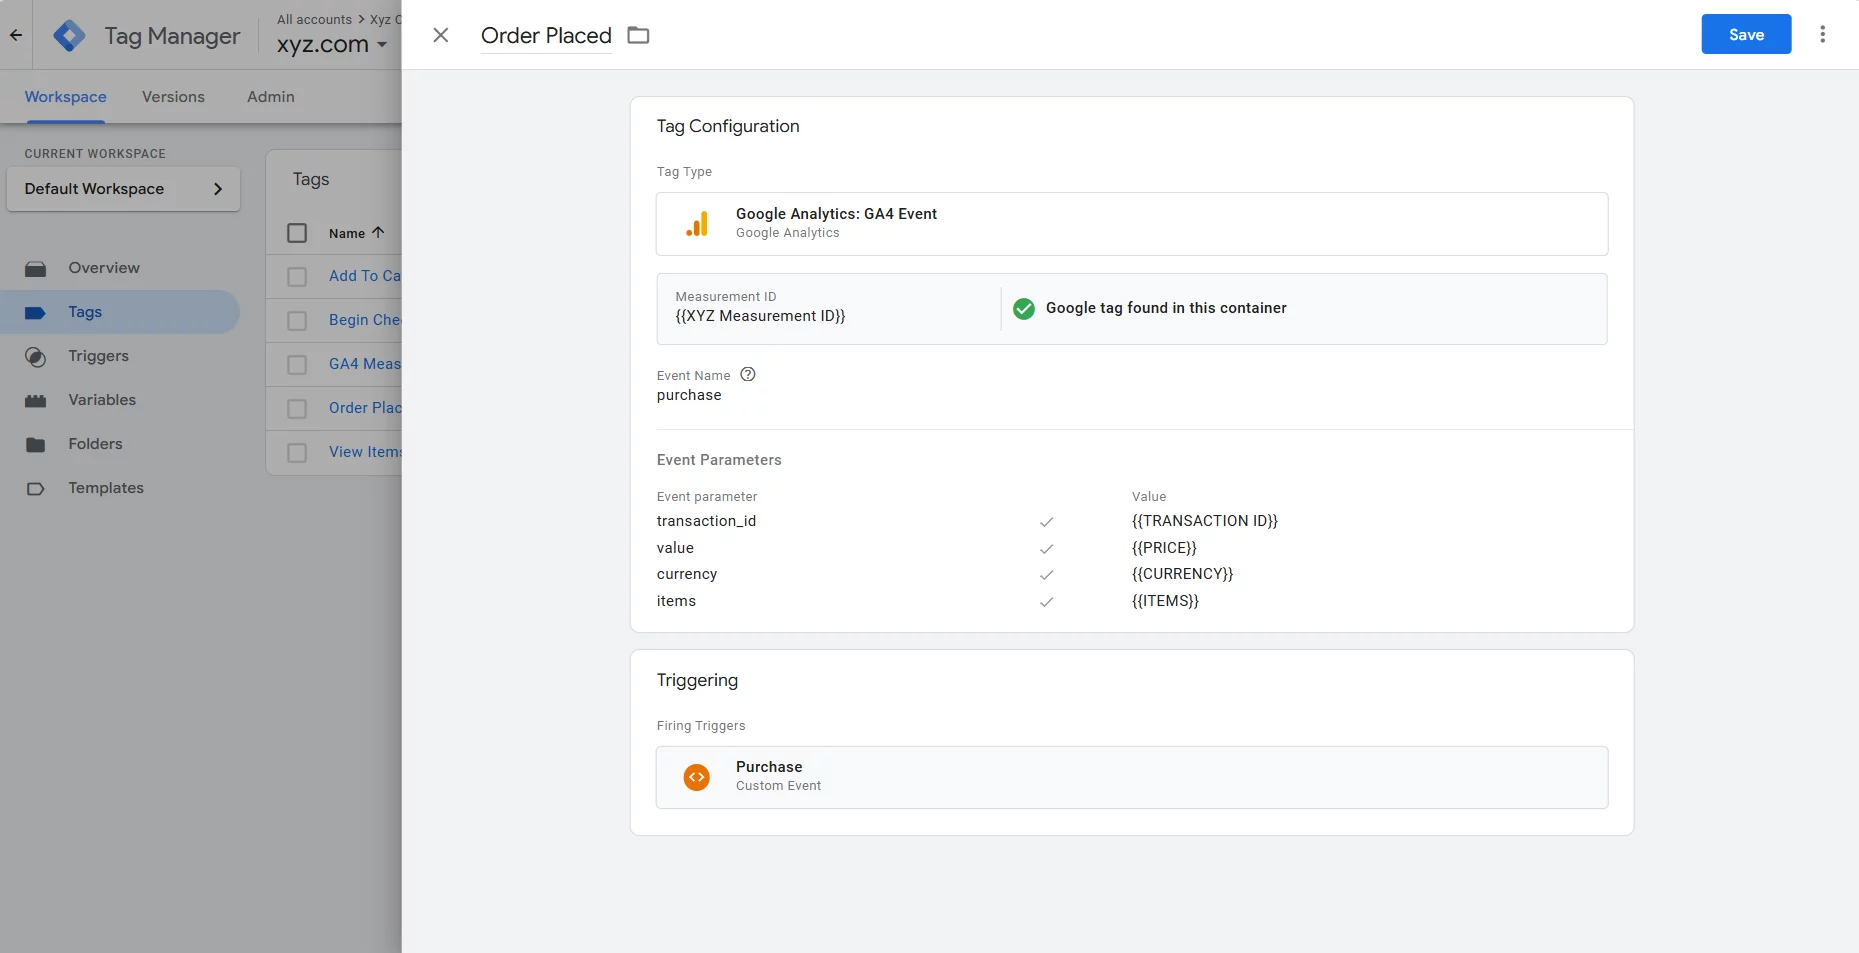
Set the trigger to
Finally, Run the following commands and make sure the code is deployed correctly
Your GA4 is ready to track ecommerce events!
Were you able to follow along the tutorial and setup the most critical ecommerce event on your Magento 2 store.
This data will give you valuable insights about your sales funnel and how you can optimize the conversion.
However, there are many other ecommerce events that you can track on your site which can give you even better insights about your customer behavior like tracking add_to_wishlist, or tracking the search queries to understand what product or category are popular among your customers, and what your customers actually want.
Additionally, you can also set up events for cancellations and refunds, or track performance of promotions. You can find all the tag from google guide link below
Would you like to integrate Whatsapp or APIs into your website or mobile app?
Would you like to share this article?
All Categories
Latest Post
- Magento 2 Rich Text Schema Setup in JSON-LD: Step-by-Step Guide
- Fixing Magento 2 Product Schema Markup | Missing “image” field FIX
- How to Dispatch Custom Events in Magento 2
- Adding Filters in Magento Admin Grid | Column and Non-Column Component
- How to add custom styles (Colors and Fonts) to Magento Admin Grid
